Signing and Encrypting Your Emails
iSafeguard™ uses end-to-end security model. That means only the email composer
and the intended recipients can read encrypted emails. Even someone who intercepts
the emails cannot read the emails.
You prepare your email the way you are used to, using your favorite email client
software, Yahoo Mail, Outlook, etc. Once done composing your email you chooses one
of the options described in the following sections to secure your email.
For example if you chooses to use hotkey you press a key combination (hotkey), Ctrl
+ Shift + E, for example, to encrypt the email. Once your email is encrypted you
send it the way you do with regular email messages.
Supported Email Clients
iSafeguard™ supports many email client programs. We have tested the software
with the following email clients:
- Microsoft Outlook
- Microsoft Outlook Express
- gmail
- Yahoo Mail
- Hotmail
- AOL Web Mail
- Juno Mail
- Lycos Mail
- Eudora Webmail
- email.com
 Note: Using Microsoft Word as email editor
in Microsoft Outlook is not supported. Note: Using Microsoft Word as email editor
in Microsoft Outlook is not supported.
Note: The signed or/and encrypted text
is displayed in base64-encoded format.
Menus and Default Hotkey Settings
This section describes menus and default hotkey settings used in iSafeguard™.
You may choose one of the following three options to sign and encrypt your email
messages or decrypt and verify signed and encrypted email messages.
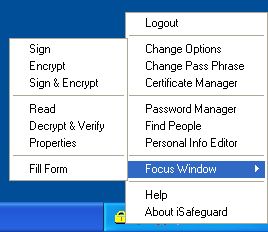
- Taskbar menu for the focus window
- Internet Explorer context menu if you use Internet Explorer to read your web-based
emails
- Hotkeys, e.g. Ctrl+Shift+E, Ctrl+Shift+R
A screen shot of taskbar menu for the focus window is shown below.
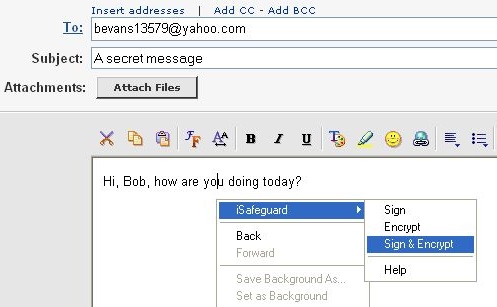
A screen shot of the Internet Explorer context menu is shown below. Based on the
content of the window the menu items are different. This screen shot shows you the
menu when you click the right mouse button at the time you compose an email message.
The meaning of the menu items, as well as the default hotkey settings are listed
in the following table.
|
Menu |
Default Hotkey |
Description |
|
Encrypt |
Ctrl + Shift + E |
Encrypt the text in the focus window and place the encrypted cipher text back to
the window. |
|
Sign |
Ctrl + Shift + S |
Sign the text in the focus window and place the signed text back to the window. |
|
Sign & encrypt |
Ctrl + Shift + B |
Sign and then encrypt the text in the focus window and then place the signed and
encrypted content back to the window. |
|
Decrypt |
Ctrl + Shift + D |
Decrypt the cipher text in the focus window and then verify the signature of the
decrypted content if singed. Finally the decrypted clear text is placed into the
window. |
|
Read |
Ctrl + Shift + R |
Decrypt and verify the cipher text in the focus window and display the clear text
in a viewer. The original cipher text is kept untouched. |
|
Properties |
Ctrl + Shift + P |
Display the crypto properties of the cipher text in focus window; the intended recipients,
the signer as well as the encryption and signature algorithms are shown. |
You can customize the hotkeys to use different key combinations. To learn more about
customizing hotkey settings, refer to section:
Hotkey Options of this user manual.
For more information about sending and receiving secure emails please refer to Tutorial: Signing and Encrypting Your Email
Messages.
 Tip: Hotkeys works with the focus
window, the window that currently has the input focus. Therefore before you hit
hotkey make sure the window has input focus by clicking in it once. Tip: Hotkeys works with the focus
window, the window that currently has the input focus. Therefore before you hit
hotkey make sure the window has input focus by clicking in it once.
Tip: Ctrl + Shift + E, for example, means
pressing the Ctrl key and the Shift key at the same time and holding to keep them
down, then press the key E, finally release them all.
Signing Email Messages
To sign your email message do the following:
- Login if you are not currently logged
in
- Compose your email message using your favorite email software
- Press hotkey Ctrl + Shift + S , or right click your mouse button
on the golden lock icon on your taskbar and then select Focus Window
and then Sign
- Select one message signer, and then click OK
- Send your email; Done
Encrypting Email Messages
To encrypt your email message do the following:
- Login if you are not currently logged
in
- Compose your email message using your favorite email software
- Press hotkey Ctrl + Shift + E , or right click your mouse button
on the golden lock icon on your taskbar and then select Focus Window
and then Encrypt
- Select one or more message recipients, and then click OK
- Send your email; Done
Signing and Encrypting Email Messages
To sign and encrypt your email message do the following:
- Login if you are not currently logged
in
- Compose your email message using your favorite email software
- Press hotkey Ctrl + Shift + B , or right click your mouse button
on the golden lock icon on your taskbar and then select Focus Window
and then Sign & encrypt
- Select a message signer and one or more recipients, and then click OK;
- Send your email; Done.
Reading Encrypted Email Messages
To read your encrypted message:
- Login if you are not currently logged
in;
- Make sure the window that contains the cipher text has the input focus by clicking
your mouse inside the window;
- Press hotkey Ctrl + Shift + R , or right click your mouse button
on the golden lock icon on your taskbar and then select Focus Window
and then Read
Decrypting and Verifying
To decrypt and verify an encoded message:
- Login if you are not currently logged
in;
- Make sure the window that contains the cipher text has the input focus by clicking
your mouse inside the window;
- Press hotkey Ctrl + Shift + D , or right click your mouse button
on the golden lock icon on your taskbar and then select Focus Window
and then Decrypt & verify
Checking Crypto Properties
- Login if you are not currently logged
in;
- Make sure the window that contains the cipher text has the input focus by clicking
your mouse inside the window;
- Press hotkey Ctrl + Shift + P , or right click your mouse button
on the golden lock icon on your taskbar and then select Focus Window
and then Properties
Note: The above discussion assumes that
you use the default hotkey settings. If you have already customized your hotkeys,
use your customized hotkeys instead.
Note: You must log in to use hotkeys.
If you are not logged in pressing the hotkey does nothing.
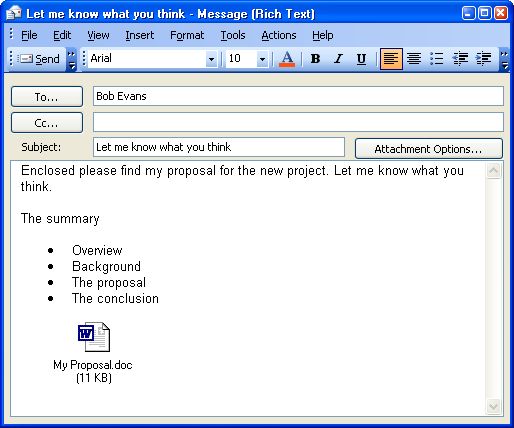
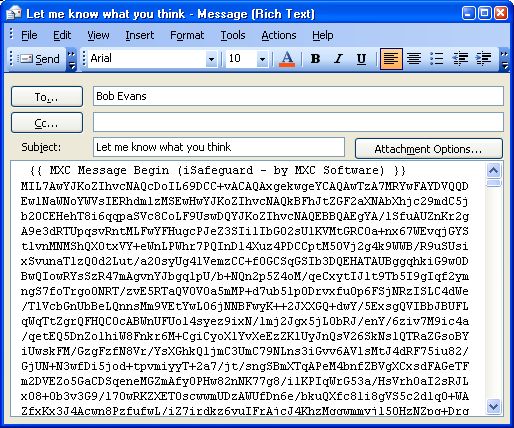
RTF And HTML Email Support
In addition to plain text email support iSafeguard™ also support RTF and HTML
emails which allows you to send email with format and rich content. The following
screen shots show you an RTF email in action.
The fist screen shot shows you the original email message with attachment.
The second screen shot shows the encrypted email message.
The last screen shot shows the content decrypted and displayed in iSafeguard™
Viewer. You may open the attachment by right clicking your mouse button on the attachment
and then select the appropriate command. In this case Microsoft Word is launched
to open the attachment.
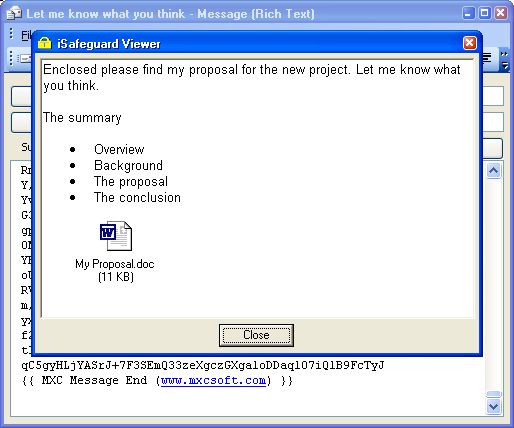
The original message is kept encrypted in your inbox.
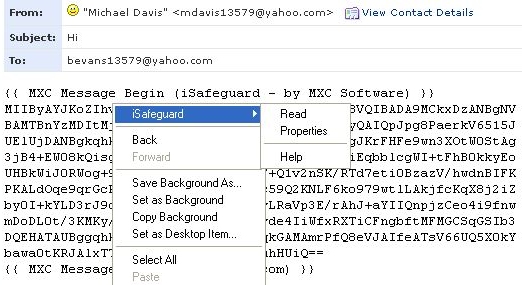
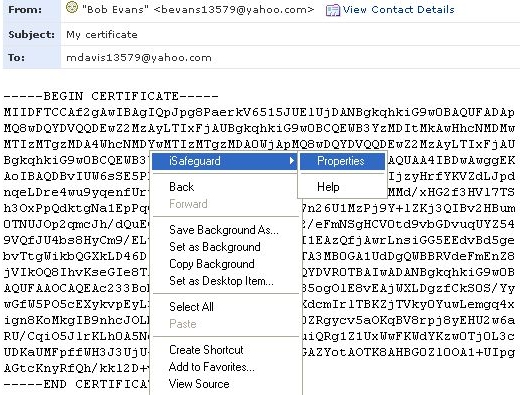
Web-based Email Support
If you use Internet Explorer as your email client you may use Internet Explorer's
context menu to sign, encrypt as well as decrypt your email messages.
Screen shot for signing and encryptging an email message:
Screen shot for reading encrypted email message:
Screen shot for importing a certificate:
Note: Make sure Internet Explorer setting "Enable third-party browser extensions"
is enabled. Otherwise the iSafeguard™ menu will not show.
To enable "Enable third-party browser extensions" setting:
- Launch Internet Explorer if it is not already running
- Select Internet Options from the Tools menu
- Click the Advanced tab
- Check "Enable third-party browser extensions" setting to make sure it is checked
- Click the OK button
|